First off, what's a
keezer you may ask? It's like a kegerator but with a chest freezer base. Since we were making our own beer for the wedding I felt it prudent to have a proper way to serve it during the evening. We didn't want to have to hire a bartender so I built my own bar. It started with a chest freezer I picked up from craigslist. Though small, I could still fit six cornelius kegs inside with a tall enough collar. Construction started with some 1 by lumber and some 2x3 framing. Because I wanted to be able to easily convert the unit back to a chest freezer I made the collar to be able to simply lift off.
 |
| Chest freezer. |
I started with a frame of 2x3s the same size as the freezer base. It is about 22"x 34" and joined with some pocket hole screws. In fact, most of the project was assembled with pocket holes to hide all fasteners and give a cleaner look. I made two of these frames, one upper and one lower.
 |
| 2x3 frame. |
I then made the faces out of 1x12 lumber and attached the frames inside. The bottom of the faces stop below the lower frame so as to wrap around the freezer base and prevent it sliding off. Again, this isn't permanently attached to the freezer so this was the best way I saw to fit the collar on temporarily. One thing I did notice about this construction is that such wide boards cup a bit so the corners don't line up quite as nicely as I would like. However, clamps are a wonderful thing!
 |
| Creating the faces and adding frames. |
I also added 2" rigid foam insulation between the frames for some insulation. I cut this with my drywall saw and it was surprisingly effective. I didn't have to use any sort of glue or fasteners, the foam just fit in with a strong push.
 |
| Foam insulation added. |
Next was finishing. I used a red oak stain I had left over from some previous projects and then applied three coats of water base urethane. This produced a really nice finish and will protect the wood and stain from abuse.
 |
| Stained. |
 |
| Urethane. |
I also added some insulating foam tape to the bottom frame to seal against the freezer base. I just used an entire roll meant for a door which came out to something like 15' or so. It made it around the entire base nearly twice.
 |
| Foam insulation. |
 |
| Added to the freezer. |
In order to make moving the keezer around easier I also put it on wheels. To keep this as temporary as possible, I made a base out of 1/2" plywood and fastened the casters to it. This should help distribute the load more evenly. I attached the plywood to the freezer base with a few metal self tapping screws into the small feet on the freezer.
 |
| Wheeled base. |
 |
| Attached to the freezer. |
 |
| Mostly finished. |
Now the lid was the next thing on my list. Since the faces stick out past the freezer base the lid needed a bit of a spacer for the hinges to attach properly. For this, I just ripped a 1x2 down to be about the height of the lid and drilled some holes through it to accommodate the bolts for the hinge.
 |
| Attached hinges. |
Most of the woodworking was done at this point so the next thing was the gas and liquid plumbing for the kegs. I had to install a manifold to split the gas supply into six supplies for the kegs. Then I installed the liquid faucets by drilling 1 1/4" holes in the front face and insulation for the shanks to pass through. These are what the faucets attach to and they came with 1/4" barbed tails on the back for attaching the tubing.
 |
| Manifold installed. |
 |
| Marking for faucet shanks. |
 |
| Holes drilled. |
 |
| Shanks installed. |
 |
| Faucets attached. |
With the manifold and faucets installed I had to next install the tubing. The gas lines are 1/4" inside diameter and the liquid lines are 3/16" inside diameter. These are the sizes recommended for proper throughput and resistance. In order to fit the tubing properly, it helps to heat it up with makes it a bit more flexible.
 |
| Heating the tubing. |
 |
| Tubing attached to liquid and gas disconnects. |
 |
| Assemblies attached to the faucets and manifold. |
Next was transferring the beer from the primary fermenters to the kegs and then fitting the kegs inside the keezer. I test fitted all six empty kegs first just to make sure they fit before having to lift six full kegs.
 |
| Kegging in progress. |
 |
| Six kegs fitted. |
The keezer was pretty much done but the dent in the lid bothered me quite a bit. It wasn't very attractive so I decided to make a cover to hide it and dress up the keezer a bit. I just built a frame from some 1x3 square stock and a nice sheet of ACX plywood cut to size. Again, this was constructed with pocket hole screws to hide all fasteners and then finished with the same stain and urethane process as the main collar. Inside the front face of the lid cover I attached a small block of wood to fit inside the lid handle so that lifting on the cover would open the freezer lid as well.
 |
| Lid cover. |
 |
| Inside. Assembled with pocket screws. |
 |
| Stained. Urethane was next. |
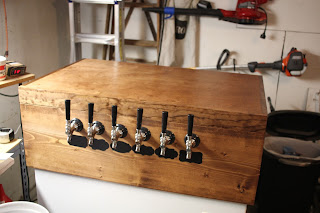 |
| Finished project. |
Half this project wasn't really woodworking but it started as such a project so that is why I'm putting it on this blog. The lid cap fits nicely and provides a nice flat top for perhaps setting glasses or signs on top of. I also attached some chalk board stickers by the faucets to label the beer taps. I soap tested all the air fittings to check for leaks and ran sanitizer through the liquid lines. All the fittings checked out and the project was complete. Huzzah!


